If your brakes are fading right now, shift to a lower gear, ease off the gas, and pull over somewhere safe to let everything cool down. Do not pour water on hot rotors. Do not keep driving and hope it resolves itself.
Do this immediately:
- Downshift to use engine braking and reduce brake demand
- Apply steady, firm pressure if your vehicle has ABS; pump gently if it does not
- Turn on your hazard lights to warn drivers behind you
- Pull off the road as soon as it is safe and park with wheels exposed to air
- Wait at least 15–30 minutes before driving again, per Fluid Fixers
Never do this:
- Pour cold water on hot rotors (thermal shock can warp or crack them)
- Ignore a pedal that sinks to the floor (that is fluid boil, not just heat)
- Continue driving if the pedal does not return to normal firmness after cooling
If the pedal stays soft or spongy after a full cool-down, call for a tow. A sinking pedal means hydraulic failure, and that is not a condition you drive through.
Key Takeaways
Fixing brake fade correctly starts with identifying whether you have pad fade, fluid boil, or a mechanical fault — the pedal feel tells you which problem you are actually solving.
| Point | Details |
|---|---|
| Immediate safety steps | Downshift, apply steady pressure, pull over, and wait 15–30 minutes before driving. |
| Pedal feel diagnoses the type | Firm pedal with weak stopping = pad fade; soft or sinking pedal = fluid boil or air in lines. |
| Fluid service interval | Flush brake fluid every two years for most vehicles; more often for towing or track use. |
| Bed in new pads properly | Run 8–10 moderate stops from 30 mph, then 6–8 firm stops from 50 mph, with cooling intervals between each. |
| Ozkonickustomz parts support | Ozkonickustomz confirms fitment by VIN and supplies vetted brake components with documented specs and return support. |
Table of Contents
- Why does brake fade happen in the first place?
- How to tell which type of fade you have
- What to do while driving if your brakes start fading
- Short-term fixes you can try after pulling over
- Mechanic-level repairs that permanently fix the problem
- How to prevent brake fade from coming back
- When should you stop DIYing and see a mechanic?
- How to choose pads, rotors, and fluid that reduce fade risk
- The physics behind brake fade
- How to check and maintain proper brake hydraulic pressure
- Signs of brake fluid contamination and how to test for it
- How to diagnose brake fade and rule out other braking problems
- What brands and part quality actually reduce fade risk
- What the brake fade conversation gets wrong
- Ozkonickustomz has the brake parts and fitment support you need
- Sources
Why does brake fade happen in the first place?
Brake fade is the reduction in stopping power caused by heat overwhelming one or more parts of your brake system. Three distinct failure modes cause it, and they require different fixes.
Pad (friction) fade happens when pad temperatures exceed the friction material’s operating range. Standard street pads typically remain stable up to high temperatures; pushing beyond that causes the organic binders in the pad to outgas, creating a vapor layer between pad and rotor that acts like a lubricant. The pedal stays firm, but the car barely slows. Repeated overheating glazes the pad surface, making the problem chronic even after cooling.
Fluid (hydraulic) fade is a different animal. Brake fluid is hygroscopic, meaning it absorbs moisture from the air over time. That moisture lowers the fluid’s boiling point. When the fluid boils, it creates compressible vapor bubbles in the lines, and a compressible fluid cannot transmit force. The result is a pedal that feels soft, spongy, or sinks toward the floor under pressure.
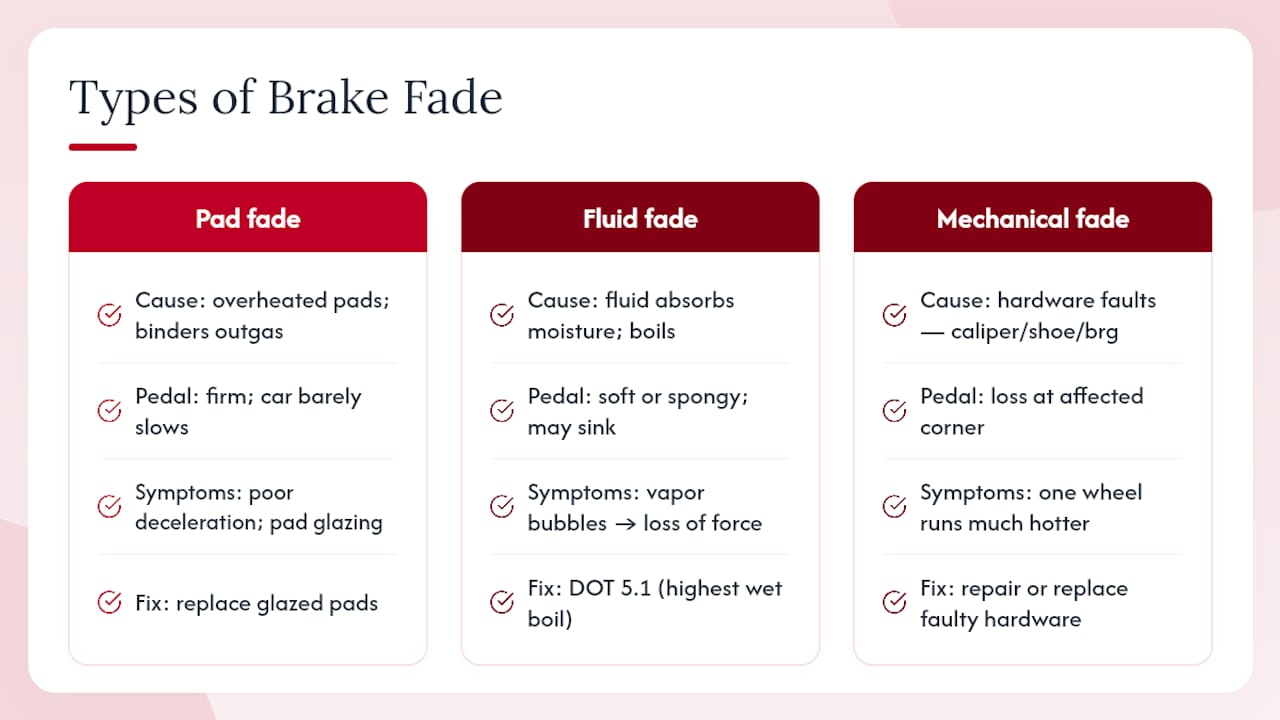
Mechanical fade comes from hardware problems: a seized caliper piston, a dragging drum shoe, or a worn wheel bearing that generates friction heat continuously. One wheel runs far hotter than the others, and the system eventually loses effectiveness at that corner.
DOT fluid boiling points give you a useful reference for how much margin you actually have. The dry boiling point indicates the fluid’s temperature limit when new, while the wet boiling point accounts for moisture absorption that lowers performance.
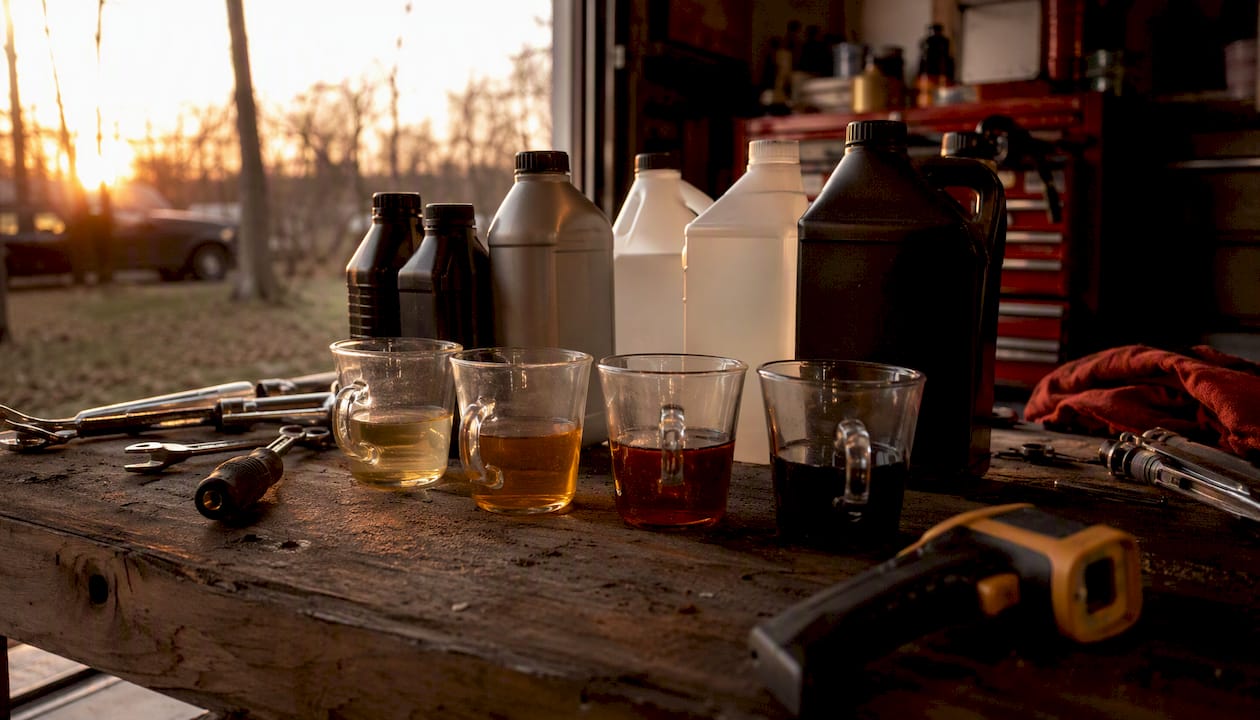
The wet boiling point matters more in practice. Because brake fluid absorbs moisture in service, the wet-boiling figure better predicts real-world performance after months of use than the dry number on the bottle.
Pro Tip: If you tow regularly or live in a humid climate, DOT 5.1 gives you the highest wet boiling point among glycol-based fluids and is compatible with most modern systems that specify DOT 3 or DOT 4.
How to tell which type of fade you have
The pedal is your first diagnostic tool. Advics Aftermarket draws a clear line: a firm pedal with weak stopping power points to pad fade; a soft, spongy pedal that sinks under pressure points to fluid boil.
Pedal feel at a glance:
- Firm pedal, car barely slows: pad fade or glazing
- Soft or spongy pedal, sinks toward floor: fluid boil or air in lines
- Pedal pulsates or vibrates: warped rotor, often from uneven heat
- One wheel noticeably hotter than others after a short drive: seized caliper or dragging shoe
After the brakes have cooled completely, do a visual check:
- Open the hood and look at the brake fluid reservoir. Fluid should be clear to light amber. Dark brown or black fluid is contaminated.
- Check the fluid level. Low fluid can indicate a leak or heavily worn pads.
- Walk around the car and look for blue or gray smoke coming from any wheel well.
- Check rotor color. Blue or purple discoloration means the rotor reached extreme temperatures.
- With the car on a flat surface and the engine off, try spinning each wheel by hand (after full cool-down). A wheel that drags or resists turning has a sticking caliper or dragging shoe.
Continental Tires lists a burning smell, longer stopping distances, and hot wheels as the clearest warning signs alongside pedal feel.
Pro Tip: A non-contact infrared thermometer (under $30 at most auto parts stores) lets you read rotor and hub temperatures from a safe distance. A wheel running 200°F hotter than its partner after a normal drive is a red flag for a mechanical fault.
What to do while driving if your brakes start fading
Stay calm. Panic leads to hard braking, which makes fade worse.
- Ease off the accelerator immediately to reduce vehicle speed without touching the brakes.
- Downshift one or two gears to engage engine braking. On an automatic, use the manual mode or select a lower range.
- Apply the brakes with steady, firm pressure if your vehicle has ABS. The system will modulate for you. If you have no ABS, pump the pedal in short, firm strokes to build pressure and allow brief cooling between applications.
- Activate your hazard lights so drivers behind you know you are slowing.
- Steer toward a safe pullout — a wide shoulder, a parking lot, or a runaway truck ramp if you are on a mountain grade.
- Park with the wheels in open air, not against a curb or in a garage, so heat can dissipate.
If you are descending a long grade and the brakes are fading, Continental Tires recommends engine braking as the primary tool to control speed and give the brakes recovery time between applications.
Do not attempt a controlled drive to a shop if the pedal stays soft after stopping. A soft pedal after cool-down means vapor or air is in the lines, and braking performance is unpredictable. Call a tow.
Short-term fixes you can try after pulling over
Once you have stopped and the brakes have cooled for at least 15–30 minutes, you have a few safe options depending on what you find.
Cool-down best practices:
- Park in shade or with a breeze across the wheels if possible
- Do not apply the parking brake while rotors are still hot; it can warp drums or score rotors
- Test pedal feel before moving; it should return to normal firmness if the issue was pad fade
Roadside checks you can safely perform:
- Fluid level and color in the reservoir (low or dark fluid = shop visit)
- Visible brake line leaks under the car (wet spots near wheels or along the frame)
- Wheel drag test by hand after full cool-down
At-home or safe-stop interventions:
If you recently installed new pads and the fade happened on the first few hard stops, you are likely dealing with green fade — outgassing from uncured binders. A controlled bed-in sequence (see Section 6) can resolve this. If fluid boil is suspected and you are competent with brake bleeding, bleeding the system removes vapor and restores pedal firmness. If you are not confident doing this, do not attempt it roadside.
Pro Tip: Carry a small bottle of fresh DOT fluid in your glovebox. If the reservoir is low and you have no visible leak, topping it off and monitoring the level tells you whether a slow leak is developing.
Mechanic-level repairs that permanently fix the problem
Short-term cooling buys time. These are the repairs that actually solve brake fade.
Routine parts work:
- Replace pads with a compound rated for your use case (street, tow, track)
- Machine rotors if they are within minimum thickness spec; replace them if they are not
- Rebuild or replace calipers with seized pistons or leaking seals
- Replace hardware: pins, shims, and anti-rattle clips that are corroded or worn
- Inspect wheel bearings for play or roughness, since a bad bearing generates heat at the hub
Hydraulic service:
A full fluid flush removes moisture-laden fluid from the entire system. PowerStop recommends a brake fluid flush every two years for most vehicles, more frequently for towing or track use. After flushing, bleed each caliper in the correct sequence (typically farthest from the master cylinder first) until clean, bubble-free fluid runs from the bleeder valve.
Pro Tip: Use a vacuum bleeder or a pressure bleeder for a solo flush. Gravity bleeding works but takes longer and risks drawing air back through the bleeder if you are not careful.
Bedding new pads and rotors:
Proper bedding prevents green fade from uncured pad material and deposits an even transfer layer on the rotor. Here is the standard sequence:
- From 30 mph, apply moderate brake pressure to slow to 5 mph. Do not stop completely.
- Repeat 8–10 times, allowing 30–60 seconds of light driving between each stop to cool slightly.
- From 50 mph, apply firm brake pressure to slow to 5 mph. Repeat 6–8 times.
- Drive at highway speed for 5–10 minutes with minimal braking to cool the system fully.
- Avoid hard stops for the first 200–300 miles.
| Repair Type | Typical U.S. Cost Range | Estimated Labor |
|---|---|---|
| Pad replacement (per axle) | $200–$300 | 1–2 hours |
| Rotor replacement (per axle) | $200–$300 | 1–2 hours |
| Full fluid flush and bleed | $100–$130 | 1 hour |
| Caliper rebuild or replacement | $200–$400 per corner | 2–3 hours |
These are ballpark ranges. Get a local quote before authorizing any work.
How to prevent brake fade from coming back
Prevention is mostly about matching your hardware to your actual use case and not asking street pads to do track work.
Pad material trade-offs:
- Organic pads: quiet, gentle on rotors, good cold bite, but low heat tolerance. Fine for light daily driving.
- Semi-metallic pads: better heat resistance, more aggressive, noisier when cold. Good for towing and spirited driving.
- Ceramic pads: low dust, quiet, stable across a wide temperature range, but expensive and not ideal for extreme track use.
Rotor choices:
Drilled rotors look aggressive but can develop stress cracks at high temperatures. Slotted rotors channel gas and debris away from the pad face without creating stress risers, making them the better choice for towing or repeated hard stops. Vented two-piece rotors are the track standard.
Cooling hardware:
Brake cooling ducts direct ambient airflow to the rotor face and are one of the most effective upgrades for vehicles that see sustained heavy braking. Cooling shims and thermal barriers installed between the pad backing plate and caliper piston reduce piston temperatures measurably and are a practical upgrade for trucks and tow vehicles.
Driving technique:
Engine braking on long descents is not optional — it is the correct technique. Riding the brakes continuously on a mountain grade is how fluid boil happens. Shift down, let the drivetrain do the work, and use the brakes in short, firm applications rather than a constant light drag.
Pro Tip: Race-only pads (compounds rated above 1,000°F) have almost no cold bite. Using them on a street car means your first stop of the morning is significantly longer than expected. Keep race pads on track cars.
When should you stop DIYing and see a mechanic?
Some brake problems are safe to diagnose and fix at home. Others are not.
Red flags that require immediate professional attention:
- Pedal stays soft or spongy after a full 30-minute cool-down
- Visible brake fluid leaking from a line, fitting, or caliper
- Any wheel that stays hot after a brief, normal drive
- Grinding or metal-on-metal noise from a wheel
- Vehicle pulls hard to one side under braking
Inspection checklist to give your mechanic:
- Pad thickness at all four corners
- Rotor thickness and surface condition (scoring, bluing, cracks)
- Caliper piston movement and seal condition
- Brake line condition (corrosion, cracking, chafing)
- Fluid color, level, and moisture content
- Wheel bearing play and temperature
Typical repair timelines: a pad-and-rotor swap takes 2–3 hours at a shop. A full fluid flush adds about an hour. Caliper service can stretch to a half-day if parts need to be ordered.
How to choose pads, rotors, and fluid that reduce fade risk
Fitment comes first. A pad that does not seat correctly against the rotor creates uneven contact, hot spots, and accelerated fade. Use your VIN or OEM part number to confirm exact fitment before ordering anything.
Specification checks:
- Pad temperature rating: confirm it covers your use case (street, tow, or track)
- Rotor minimum thickness: stamped on the rotor hat; never machine below it
- DOT fluid wet boiling point: higher is better for heavy-use applications
- Rotor construction: vented vs solid, and whether the application calls for slotted or plain face
Vendor vetting:
- Buy from sellers who publish documented specs, not just marketing copy
- Confirm the return policy covers fitment issues
- Ask whether the pads require a specific bedding routine (some high-temp compounds do)
- Avoid unbranded or suspiciously cheap rotors; thin castings warp faster under heat
Pro Tip: Request the technical data sheet for any performance pad before buying. A legitimate manufacturer publishes the friction coefficient, temperature range, and recommended applications. If that sheet does not exist, the pad is not worth the risk.
Numbered selection checklist:
- Pull your VIN and confirm OEM pad and rotor part numbers
- Identify your use case: daily commute, towing, mountain driving, or track
- Match pad compound to that use case using published temperature ratings
- Verify rotor thickness against the minimum spec stamped on the existing rotor
- Select DOT fluid by wet boiling point, not just DOT number
- Confirm the seller offers fitment support and a documented return policy
The physics behind brake fade
Brakes convert kinetic energy into heat through friction. Every time you press the pedal, the pad clamps against the spinning rotor and that energy has to go somewhere. At moderate temperatures, the rotor and pad absorb and radiate heat fast enough to keep up. Push the system harder than it can dissipate, and temperatures climb.
At the pad level, high heat breaks down the organic binders in the friction material, releasing gases that form a thin film between pad and rotor. That film reduces the coefficient of friction sharply. The physics here are straightforward: friction force equals the coefficient of friction multiplied by clamping force. If the coefficient drops by half, stopping power drops by half even with the same pedal pressure.
In the hydraulic circuit, the same heat travels through the caliper body into the brake fluid. Glycol-based fluids (DOT 3, 4, and 5.1) have a specific boiling point that drops as moisture content rises. Once the fluid reaches its boiling point, dissolved gases come out of solution and form compressible vapor pockets. Pascal’s law requires an incompressible fluid to transmit pressure; vapor does not qualify. The pedal goes soft because you are compressing gas instead of moving a piston.
How to check and maintain proper brake hydraulic pressure
Hydraulic pressure in a disc brake system depends on three things: an intact master cylinder, sealed lines with no air or vapor, and calipers that move freely. Any one of those failing reduces the pressure reaching the pads.
Check the master cylinder reservoir monthly. The level drops gradually as pads wear (fluid fills the caliper space), so a sudden drop points to a leak. Fluid that looks dark, cloudy, or has visible particles needs replacing, not topping off.
To test system pressure at home, pump the pedal with the engine off until it firms up, then hold steady pressure for 30 seconds. If the pedal slowly sinks under constant pressure, the master cylinder is bypassing internally or there is a leak somewhere in the circuit. Either condition requires a shop visit.
Bleeding the system removes air and vapor. The standard sequence runs from the caliper farthest from the master cylinder (typically right rear) to the closest (left front), though your vehicle’s service manual may specify a different order. Bleed until the fluid runs clear and no bubbles appear at the bleeder valve.
Signs of brake fluid contamination and how to test for it
Contaminated fluid is one of the most overlooked causes of recurring fade. The signs are not always obvious.
Visual signs:
- Dark brown or black fluid in the reservoir (oxidation and rubber particle contamination)
- Cloudy or milky appearance (water intrusion, especially in older systems)
- Visible sediment or particles floating in the reservoir
Performance signs:
- Spongy pedal that gets worse in hot weather or after hard use
- Pedal that firms up after pumping but softens again under sustained pressure
- Corrosion on brake line fittings or inside the reservoir cap
How to test:
Brake fluid test strips (available at most auto parts stores under brands like Phoenix Systems or Saber) measure copper content in the fluid. Copper leaches from the brake lines as the fluid degrades; a high copper reading indicates the fluid is past its service life even if it looks acceptable. Some strips also test for moisture content directly.
A more precise method uses a refractometer calibrated for brake fluid, which measures the refractive index and correlates it to water content percentage.
How to diagnose brake fade and rule out other braking problems
Not every braking problem is fade. A methodical check separates fade from worn pads, warped rotors, or a failing master cylinder.
- Note when the problem occurs. Fade typically appears after sustained or repeated hard braking. If poor braking happens on the first stop of the day, the issue is more likely worn pads or a mechanical fault, not heat-induced fade.
- Check pedal feel at rest. With the engine running, press the pedal firmly and hold it. A pedal that slowly sinks indicates a master cylinder or line leak, not fade.
- Assess pedal feel under braking. Firm pedal with weak stopping = pad fade or glazing. Soft pedal = fluid boil or air in lines. Pulsating pedal = warped rotor.
- Check for uneven wheel heat. After a normal drive, compare wheel temperatures by feel (from a safe distance) or with an IR thermometer. One hot wheel points to a mechanical fault, not system-wide fade.
- Inspect pad thickness. Pads worn below 2mm cannot generate adequate friction regardless of temperature. Replace them before diagnosing anything else.
- Test after cool-down. If braking returns to normal after 15–30 minutes, the issue is heat-related (fade). If the problem persists cold, the cause is mechanical or hydraulic.
Grassroots Motorsports makes the point that diagnosing fade type first prevents unnecessary repairs — replacing pads when boiled fluid is the actual cause wastes money and leaves the real problem in place.
What brands and part quality actually reduce fade risk
The aftermarket brake parts market has a wide quality range. A few markers separate parts worth buying from parts that will fail under heat.
Pads: Look for compounds from manufacturers who publish friction coefficients (the “EE,” “FF,” “GG” FMSI ratings on the box). An “FF” rating means the pad delivers consistent friction across a temperature range. Brands that publish full technical data sheets and application guides are generally more trustworthy than those that rely only on marketing claims.
Rotors: Casting quality matters more than surface finish. A rotor with consistent wall thickness throughout the vented section dissipates heat evenly. Cheap rotors often have thin or uneven vane spacing that creates hot spots. Minimum thickness specs are stamped on the hat; never buy a rotor that arrives thinner than its own spec.
Fluid: For most street drivers, fresh DOT 4 from a reputable brand (Castrol, Valvoline, Prestone) is adequate. For towing or performance use, DOT 5.1 offers a higher wet boiling point. Avoid DOT 5 (silicone-based) in systems designed for glycol fluid — it is not interchangeable and can damage seals.
Buying from a vendor who confirms fitment by VIN, publishes specs, and supports returns on incorrect parts eliminates most of the risk. That combination of verified fitment and documented specs is what separates a reliable parts source from a warehouse that ships whatever is in stock.
What the brake fade conversation gets wrong
Most guides treat brake fade as a single problem with a single fix. It is not. The two most common misdiagnoses we see are drivers bleeding their brakes when the real issue is glazed pads, and drivers replacing pads when the fluid has been boiling for months.
The pedal-feel test is the fastest way to avoid both mistakes. Firm pedal, weak stopping: start with the pads and rotors. Soft pedal: start with the fluid. That one check saves hours of unnecessary work.
For an older truck that keeps overheating its brakes, the priority order is almost always the same: flush the fluid first (cheap, fast, often immediately effective), then assess pad compound (match it to the actual load), then look at hardware (sticking calipers are more common than people expect on high-mileage trucks). Cooling upgrades like brake cooling ducts or thermal shims come after the basics are sorted, not instead of them.
Ozkonickustomz carries vetted brake components with confirmed fitment, so you are not guessing whether the part will work when it arrives.
Ozkonickustomz has the brake parts and fitment support you need
When your brakes have overheated once, the clock is running on the next failure. Replacing pads, rotors, or fluid with parts that are confirmed for your exact vehicle is the only way to know the repair actually holds.
Ozkonickustomz sources brake components and hardware directly from vetted manufacturers, with fitment confirmed by VIN or OEM part number before anything ships. No guessing, no returns because the rotor hat diameter was off by a millimeter. The brake-related hardware and vehicle-specific components on the site come with documented specs and real support if you have fitment questions. If you are doing a full brake upgrade and want to understand the broader case for going beyond OEM, the brake upgrade guide on the Ozkonickustomz blog walks through the trade-offs. Start with your VIN, confirm fitment, and place your order knowing the parts will work when they arrive.
Sources
- Brake fade - Wikipedia
- Brake fade - Brake & Front End
- Brake fade: Causes, symptoms and how to help prevent it | Continental Tires
- What is “brake fade” and how can it be prevented? | Advics Aftermarket
- Towing Safety & Tips: Brake Fade and Fluid Boil | PowerStop Brakes
- Brake Fade vs Boil: The Difference That Changes the Fix - Fluid Fixers